How to Memorize Anything
Memorization is an essential part of any learning process.
No matter what you're learning, being able to recall information "out of thin air" can:
Improve your decision-making
Enhance your creative process
Speed up your task completion
Promote your independence on important tasks
Decrease your dependence on reference material
In this post, you'll learn the most effective techniques for remembering anything.
1. How to Organize Your Learning
Before trying to memorize anything, you should first organize the material you need to memorize.
Here are two options for organizing your learning material:
Option A: Organize Your Learning Using Mind Maps
“One creates a Mind Map by drawing lines of main points to subsidiary points, which branch out further to tertiary points, and so on. Ideas are distilled into as few words as possible and whenever possible are illustrated with images. It's a kind of outline, exploded radially across the page in a rainbow of colors, a web of associations that looks like a prickly bush, or a neuron's branching dendrites. And because it is full of colorful images arranged in order across the page, it functions as a kind of memory palace scrawled on paper.” - Joshua Foer, Moonwalking with Einstein
One effective way to organize your learning material is through a Mind Map:

A Mind Map like the one above turns the material you're learning into a visual reference guide. This guide helps you to understand how ideas connect and relate to each other.
Instead of learning a series of random information, a Mind Map helps put those facts into context.
Start by creating a simple Mind Map that organizes your ideas and information.
There are no correct ways to create a Mind Map. You're free to categorize, connect, group together, or separate your ideas how you want.
Here are some ideas to help get you started:
Organize information into shared categories, topics, or groups
Group your information into individual parts using a method like MeCe
Use Systems Thinking to define the relationships between different parts of a system
Use your textbook or course as a guide (your primary source material is likely already organized, so re-create it in a visual Mind Map)
When organizing your Mind Map, you can use connections that make sense only to you. Your mind map doesn’t have to make sense to anyone else but you.
Option B: Organize Your Learning Using a Memory Palace
“The idea is to create a space in the mind's eye, a place that you know well and can easily visualize, and then populating that imagined place with images representing whatever you want to remember. Known as the "method of loci" by the Romans, such a building would later come to be called a "memory palace." - Joshua Foer, Moonwalking with Einstein
Another method for organizing your learning is the Memory Palace. Here's how a Memory Palace works:
Imagine a home that you grew up in as a child. In your imagination, see yourself walking through the front door. Look around at everything you can remember. Observe the walls, the furniture, the entrance room's shape, and the flooring's type and color. Walk to the adjacent rooms and continue to explore all around the space, including all the detail you can.
You can even try this same exercise in any physical location you've ever been to. Without much effort, you'll find that you can remember most physical locations in this way.
A Memory Palace, also called Simonides' Technique, uses this natural ability as a tool for memorization.
According to Joshua Foer in Moonwalking with Einstein:
"To use Simonides' technique, all one has to do is convert something unmemorable, like a string of numbers or a deck of cards or a shopping list or Paradise Lost, into a series of engrossing visual images and mentally arrange them within an imagined space, and suddenly those forgettable items become unforgettable."
A Memory Palace uses unique associations to turn a mundane list of information into a hyper-effective memory aid.
Here are the steps for organizing your learning with a Memory Palace:
Create associations
Build your Memory Palace
Review your Memory Palace
Step 1: Create Associations
Begin by creating a list of the information you need to remember. It could be a shopping list, a to-do list, or a list of concepts for an upcoming test.
After you've created your list, choose a unique visual association for each item. According to the Ars memoriae, one of the oldest books on memory techniques, the more bizarre, funny, or unusual, the more likely you will remember them.
Here's what a simple shopping list looks like with a unique visual association for each item:
Apples → A witch offering you an apple
Toothpaste → A vehicle-sized tube of toothpaste
Cashew milk → Your childhood self squeezing milk out of tiny cashews
Hand soap → A small bottle of hand soap uncontrollably spewing out soap suds
Bread → A chair made of bread
As you can see in the above list, the associations are bizarre and completely unrealistic. That’s the key. These unique associations will make it easier to remember the list later on. And as mentioned in the Ars memoriae, the more ridiculous the association, the better.
By the end of this step, you should have a list of items you need to remember and a specific visual association for each.
Step 2: Choose Your Spatial Location
Once you've created your list of associations, the next step is to pick a location you’ll use for your memory palace.
There is no single strategy for choosing a location. You can use just about any place you have in your memory. It may be helpful to pick a place with some relation to the content you're trying to memorize. For example:
If you need to remember a list of financial concepts, pick a bank you visit often
If you need to memorize a series of math concepts, pick a math classroom at your high school
If you need to learn a set of principles for a nutrition class, choose your favorite grocery store
The location you decide to use for your Memory Palace is up to you. There is no correct way of picking one over the other. However, be careful not to reuse Memory Palaces. For example, if you use your childhood home to memorize a series of concepts, it's best to use that location once. Using one Memory Palace for a single information set will help prevent confusion and mixups later.
Step 3: Build Your Memory Palace
Now it's time to start "furnishing" your Memory Palace with your list of associations. Once again, there is no one right way to do this. It's up to you to decide how you want to place your associations in your Memory Palace.
Start by mentally walking through each room or area of the location. Take the first item and its association on your list and choose where to place it. You might imagine the association in a room, on the wall, or in place of where another item goes in real life. You can place 1-3 items per room or area, using the entire space as you remember it.
Using our example list from above, your Memory Palace might have the following items placed throughout your childhood home:
Apples → A witch offering you an apple in the dimly-lit living room
Toothpaste → A vehicle-sized tube of toothpaste in the garage instead of your car
Cashew milk → Your childhood self squeezing milk out of tiny cashews into a bucket in the kitchen
Hand soap → A small bottle of hand soap uncontrollably spewing out soap suds in the bathroom
Bread → A chair made of bread sitting on your balcony
You may find it helpful to draw out the “floor plan” on a piece of paper to write down each item/association. You can use this as a reference to double-check an item's location or verify what it represents.
After you’ve organized your learning with a Mind Map or a Memory Palace, you’re ready to start memorizing.
In the next section, you’ll learn about effective memorization strategies. Use these strategies with the learning you organized in this section.
2. How to Memorize Effectively
Forced Retrieval
"All mastery comes from various types of forced retrieval." - Peter C. Brown, Make It Stick
Forced retrieval is an intentional recollection of something in your memory.
Recalling information using forced retrieval is relevant at every level of skill development:
If you're a beginning music student, recalling the name of the notes on the staff is a skill that requires retrieval
If you're an educator, recalling a mental model of the lesson timeline improves your pacing
If you're a public speaker, keeping a mental map of your speech can keep you on track
Forced retrieval can also be helpful in more unique ways:
Solving problems using mental models and more organized forms of thinking
Improving your analysis of a problem or inquiry
Competing in the World Memory Championships
Forced retrieval is all about making information available to you right when you need it.
The simplest form of practicing forced retrieval is the Notecard Method.
The Notecard Method is simple:
View a question, term, or figure on one side of a notecard;
Force yourself to remember the answer, definition, or terms on the back of the notecard.
After you try to remember what’s on the back of the card:
If you're correct, you might wait a few days before quizzing yourself on that card again;
If incorrect, review the card again that same day until you can remember it easily.
Over time, as cards become easier and easier to remember, you increasingly add more time until the next review.
The more often you do this, the more likely you will remember the information when needed.
The Importance of Spacing
The most crucial aspect of forced retrieval is the time between your retrievals.
Remembering something a few minutes after you've learned it is easy. But with each day that passes, that information becomes more difficult to remember.
This is called the "Forgetting Curve."
The psychologist Herman Ebbinghaus was one of the first to study the Forgetting Curve.
The Forgetting Curve shows how the information that we learn tends to fade over time:

The Forgetting Curve teaches us three important things:
As time goes on, we start to forget what we've learned
The more that we force ourselves to remember what we've learned, the slower we forget it
Using increased periods between remembering can further improve our ability to remember
While we can't force ourselves not to forget, we do have control over two key aspects of our learning:
Forcing ourselves to remember what we're learning
Spacing out the time periods between our remembering
Taking control of these two variables can dramatically improve your ability to retrieve information from memory.
How to Use Anki for Forced Retrieval
Implementing forced retrieval has never been easier, thanks to free programs like Anki.
Anki is a free program that combines all the elements of effective memorization.
With Anki, you can:
Create digital front/back notecards and organize them into "decks"
Create fill-in-the-blank cards to remember specific terms and keywords
Turn checklists into memorizable resources for remembering the steps of a task
Turn images, charts, and diagrams into study material using masks that hide parts of the image for you to guess
Getting Started with Anki
Anki's most powerful feature is its forced retrieval algorithm.
After creating your Anki decks, Anki will create individualized study sessions for you.
In your study sessions, Anki will present you with a card and allow you to rate how easily you were able to remember it (or not).
Using its internal algorithm, Anki will then determine when to review cards next:
For material that you were able to remember right away, Anki will wait a few days before showing that card again
For material that was more difficult to remember, Anki might show you that card again in that same study session or after less time than if you were able to remember it right away
For material that you were unable to remember, Anki will show you that card again within a few minutes
Anki takes the guesswork out of figuring out how long you should space out your retrievals.
All you have to do is quiz yourself daily and rate how well you were able to recall the card, and Anki will do the rest.
To get started with Anki, follow these steps:
Go to https://apps.ankiweb.net on your desktop or laptop
Download and install the Anki version for your computer type (Mac OS, Windows, or Linux)
To create your first Anki deck, follow these steps:
On the main Anki screen, click on the button titled Create Deck at the bottom of the screen
Type in a name for your deck and click OK
On your home screen, double-click on the new deck you created
At the top of the screen, click on Add
In the field for Type at the top of the screen, select which card type you'd like to create:
Basic — This creates a simple front → back card (you will only be able to review the card one way)
Basic (and reversed card) — This creates two regular cards (front → back / back → front) so you can review in both directions
Enter the text that you want on the front of the card
Enter the text that you want on the back of the card
Click on Add
Repeat steps 7. - 10. until you've added all the cards for your deck
To review your cards, follow these steps:
On the main Anki screen, double-click on the deck you would like to review
Double-click on the button titled Study Now
Read the card displayed on the screen
Verbalize to yourself the response on the other side of the card
Press the space bar to reveal the other side of the card
Using the numbers on your keyboard, select one of the following ratings at the bottom of the screen
Continue steps 3. - 5. until you have completed the review of your deck
Continue this process daily until you have reviewed all your cards for the day
In Anki, you can create many decks for whatever topics you're studying. You can also add new cards to any deck at any time.
To get even more out of Anki, you can also add different Note Types, which allow you to create different types of cards, including:
Image occlusion - This hides certain parts of an image. This works best for remembering terms on a diagram, map, or chart.
Cloze - This creates fill-in-the-blank cards for phrases, sentences, and statements.
How to Memorize and Review Your Memory Palace
If you decided to create a Memory Palace to organize your learning, now you need to review it to “make it stick.”
While the Memory Palace technique is effective, the forgetting curve still applies.
Without forced retrieval of your Memory Palace, you're likely to forget some or most of the items.
To "make them stick," you'll need to review your Memory Palace at spaced-out intervals. With each review, the associations will become stronger, and remembering will become easier.
Here are some tips and recommendations for reviewing your Memory Palace over time:
Use Forward Chaining: Forward chaining helps you remember items in a particular order. Begin by grabbing your original list and hiding all the items with another sheet of paper. Challenge yourself to imagine your Memory Palace and mentally retrieve the first item on the list. Reference your list to ensure you remembered the item, then cover it again. Next, challenge yourself to review the first two items. If you're correct, add another item and challenge yourself to remember the order of the first two. If you can't remember the next item, go back to your list, refresh your memory, and start again at the beginning. Each time you remember the complete list, add another item and begin at the beginning. Do this until you can remember the entire list without needing your reference list.
Enhance with Anki: You can enhance the Memory Palace technique by pairing it with Anki. This works best if you also need to remember additional information about each item. After you've made your Memory Palace, create a card for each item on your list. Use fill-in-the-blank or front-back settings for the information you need to remember. This way, you'll remember the order of the items using your memory palace and the information for each using Anki.
Use Spaced Retrieval: Add your handwritten diagram of your Memory Palace to Anki. You can create a front-back card for your palace or use masks to hide each room or item. This way, Anki will prompt you to review your Memory Palace to test your memory. Use the personal ratings when reviewing so Anki can best determine when to show you the card in the future
Recording, Listening, and Reciting (The RLR Technique)
The RLR Technique is great for memorizing word-for-word material.
You might find the most value in this technique if you want to memorize:
Lines for a play, commercial, or speech
Your favorite passages in film and literature
Talking points for a presentation, sales pitch, or workshop
Material for a writing test
As the name implies, the Record-Listen-Recite technique involves recording yourself and listening.
Here are the steps for using the RLR Technique:
Record yourself reading the text or passage
Listen to yourself reading the text or passage
Recite the passage while listening using forward chaining
Record yourself
1. Record Your Material
Start by printing out or opening up a copy on your nearest screen of what you need to memorize.
Use an audio recorder to record yourself reading the material exactly as you want to remember it.
Title and save the recording.
When recording, speak a little slower than you usually do. This will make it easier to review the recording later on.
Depending on what you're memorizing, here are a few considerations:
Separate recordings. If you're memorizing separate recordings, you should organize them into files. Send the recordings to your computer and create a file system to organize them. You should be able to open up the exact recording you need within a few seconds.
Long material. If the material is very long, you might consider breaking up the material into shorter chunks. This is a technique called chunking. Chunking involves breaking down large amounts of information into smaller, more manageable parts. These parts will be easier to practice and remember because they're shorter. Later, you'll be able to put them together to practice the material.
2. Listen to Yourself
After you've made your recordings, the next step is to listen to the recording(s) often.
In this Listening step, don't worry about being able to recite or recreate the material just yet. Focus on hearing and listening to the audio recordings.
Listen to them in the car, in the shower, during breaks, or during walks or jogs. The more you listen to your audio recording, the quicker you’ll be able to remember them.
3. Recite the Passage and Use Forward Chaining
As the material starts to "stick," you'll be able to recite more and more of it out loud. This is a natural way of practicing your material. For most people, this is enough to memorize the material as needed if you start with enough time.
If you need to memorize the material sooner, use a technique called forward chaining:
Sit down with your recordings, learning material, and something to write with.
Start the recording from the beginning and recite it along with the recording. The goal is to recite precisely like the recording. It should sound like two identical recordings are playing.
Once you discover your first error, pause the recording. Then, write down the time stamp on the recording - this is the end of the first chunk you'll focus on memorizing.
Restart the recording and repeat step one until you can pass the time stamp without errors. If you can pass the time stamp without mistakes, you've entirely recalled the first chunk.
Repeat steps 1. - 4. until you've memorized the entire recording.
3. How to Track Your Progress
When you learn anything, tracking your progress from start to finish is crucial.
If you can see the specific growth in your learning, you're more likely to continue with it. Memorizing is no different.
Programs like Anki make it easy to track your progress by providing you with analytics. Anki generates these analytics using your responses in your study sessions.
For other memory projects not in Anki, at least, you should always track:
The topic/subject that you studied (using some form of forced retrieval)
The dates that you reviewed the material
How difficult it was to recall the material
This simple form of tracking is a Retrospective Revision Timetable.
Here's what it looks like:
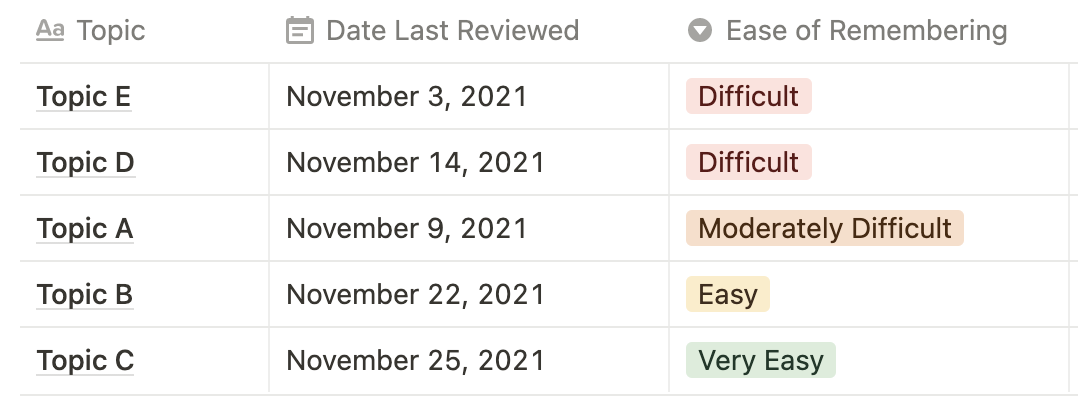
How to Use a Retrospective Revision Timetable
A Retrospective Revision Timetable lets you track your memorization ability for various subjects and topics simultaneously.
In the simple example above, the topics are listed in the left-hand column. The second column displays the date the topic was last recalled. The colored columns represent the ease of remembering the topic.
Look at your list and select the first topic that you most recently rated as Difficult
Review the topic using forced retrieval strategies of your choice (see sections above)
Update the Date Last Reviewed column to today’s date
Update the Ease of Remembering column to your own subjective rating of your ease of remembering the content for that topic (i.e., Difficult, Moderately Difficult, Easy, Very Easy)
Repeat steps 1. - 4. until you finish your study session
Download the LearnChangeDo Retrospective Revision Timetable
The LearnChangeDo Retrospective Revision Timetable template automatically sorts and prioritizes your subjects, topics, dates of review, and ease of remembering across multiple subjects using Notion. Easily duplicate it for any learning projects, and customize it further to your personal preferences.
Click here to download the LearnChangeDo Retrospective Revision Timetable.
Need some extra help with your memorization?
Send me an email at gabe@learnchangedo.org to ask me a question directly, and don’t forget to subscribe to my email list below for more on how to accelerate your learning ability.