How to Accelerate Your Learning Ability
All effective learners have one key thing in common:
They’re active learners.
If you want to master a skill, acquire new knowledge, or become an expert in a field, you need more than passive skimming and listening to information. Active learners (as opposed to passive learners) use specific (sometimes ridiculous) techniques, strategies, and tools to maximize their knowledge acquisition and retention.
And the best thing about these skills is anyone can learn them.
In this guide, you’ll learn 18 proven strategies, each commonly used by some of the most successful learners in the world. Each one can help you accelerate your learning ability and achieve your learning goals faster than ever before.
The learning strategies below are grouped by their stage in the learning process:
Priming: Preparing for the learning process.
Integrating: Exploring new concepts or skills for the first time.
Remembering: Recalling facts and isolated concepts.
Understanding: Explaining ideas and concepts.
Applying: Using what you’ve learned in new situations.
Analyzing: Drawing connections between ideas and concepts.
Evaluating: Assessing the quality of a concept, idea, or ability.
1. Priming
Pre-Studying
What is it?
Pre-studying is when you “preview” a new unit, chapter, topic, or chunk of learning material before engaging with it more deeply.
Why it works
When we learn new information, our brains actively form mental representations (also called schemas). The more you know and understand a topic or concept, the more detailed and robust your mental representations become.
By pre-studying, you create initial context and “early versions” of your mental representations. This makes later learning easier by allowing you to “hang” new information on the existing schema you formed during your pre-studying. Without pre-studying, all information you discover will be unique and novel, making your initial understanding (and remembering) more difficult.
How to use it
You can use pre-studying for self-guided learning projects and guided learning in a course.
Depending on your learning materials, here’s how you can integrate pre-studying:
If you’re using a textbook or other reading materials, start by skimming through all the pages individually — read headlines, glance through visuals and images, and get an overall idea of the order the information is presented and what you’ll be learning later on
If there is a summary at the end of the chapter or reading material, read through it and familiarize yourself with key ideas and concepts
Look up the definitions of any new vocabulary words and read through simplified definitions and explanations of each
After you finish skimming the material, use your natural curiosity to generate questions about the material
For an accelerated reading retention method, check out the ARR Method here.
Create an Effective Learning Goal
What is it?
A learning goal is a statement that describes what you should be able to do after you finish learning.
Why it works
Without a clear goal, it’s hard to tell if your learning was effective.
All learning should lead to being able to do something you couldn’t do before. Creating a learning goal gives you a clear outcome to work toward. It also helps you figure out the knowledge and skills to get there.
A good learning goal:
Describes what you should be able to do when you’re done learning
Includes a description of the outcome or context it will occur in
Uses a metric to measure your progress
How to create one
When you get a prescription, your pharmacist writes a “sig” on the bottle. It usually reads something like:
“Take one tablet by mouth daily with food.”
A sig is effective because it uses clear, concise language: (verb) (how many) (what) (method) (frequency) (additional requirements).
Similarly, your learning goal should clearly define what you should be able to do when you’re done learning.
To create a learning goal, follow these steps:
Define the behavior you’ll be able to do when you’re finished learning. Use words like explain, perform, solve, pass, complete, etc.
Describe the outcome or context for how this behavior will occur. Include the people, places, and things needed.
Set a metric to measure your progress. Define how many, at what frequency, a dollar amount, a certain number of successes, a percentage of successful tries, etc.
Add any additional requirements (context, specifics, conditions, etc.)
Write out your learning goal using as few words as possible — for example:
Reach a ____ Chess rating through FIDE.
Score ____% on the ____ test on ____.
Speak ____ in ____ for ____ days with no translation help.
To define and convert your learning goal into a complete learning plan, download the Learning Plan Management System for Notion here.
Generate Current Questions
What are they?
Current Questions are the questions you already have when you start creating your learning goal.
Why they work
When your brain is put in an unfamiliar situation, it automatically attempts to get oriented.
It generates hypotheses about how things work, makes assumptions about what’s true, and estimates the likelihood of specific outcomes. Your brain frantically makes these inquiries to orient to your situation.
These inquiries, which I call Current Questions, help you create a path between your present and future self. If you capture (write) your current questions, you lay the foundation for a learning plan you can follow.
The first step to creating a self-guided learning plan is capturing your current questions.
How to capture Current Questions
Grab a sheet of paper (or a digital doc) and start writing down everything you're curious or confused about.
Here are a few probing ideas:
What would you ask an expert or someone teaching you your learning goal?
What seems the most confusing or complex about your learning goal?
What aspects of your learning goal do you feel most insecure about?
What aspects of your learning goal seem intimidating or complex?
What knowledge or skills do you already know you don't know?
Click here to learn more about capturing current questions and creating learning plans.
Create a Progress-Tracking System
What is it?
A progress tracking system helps you understand the gap between you and your learning goal.
Why it works
You should always be able to tell if your learning activities are working.
It’s surprisingly easy to invest dozens of hours in learning materials without making any meaningful progress toward your learning goal. This happens most often because it’s hard to tell if what you’re learning is “moving the needle.” One way is to track your progress constantly.
Start with the metric you chose in your learning goal. When you begin your learning plan, capture your current baseline (what you can do right now without any learning). Then, re-capture your ability over time and measure the gap between it and your learning goal metric.
Progress tracking also helps you stay effective. If your learning activities are generating measurable progress toward your learning goal metric, you can be confident they’re working. If you’re not progressing, you might need to change your learning activities.
But you can only “see” this if you regularly track your progress.
How to create a progress tracking system for your learning goal
Write down your learning goal metric
Write down your current baseline
Choose a progress over-time method to track your progress:
Total frequency. The total number of occurrences of a specific action or behavior in a particular period until you reach your goal.
Percentage over time. The percentage of successful attempts or total completion of a number over time.
2. Integrating
ARR Method
What Is It?
The ARR Method is a method for exploring and integrating new information through books or any other reading materials.
Why It Works
The more meaningful your interactions with the material you learn, the better.
Much of learning is about creating strong mental associations and actively navigating them “out of thin air.” This is why reading and re-reading chapters, slides, or course materials rarely leads to effective learning: no new associations are formed, and you aren’t forcing yourself to remember anything.
The ARR Method helps you get around this by maximizing the number of meaningful associations you create with your study material and forcing you to recall what you’ve learned through summarizing and explaining.
How to Use It
1. Activate
Before learning anything new, brainstorm what you already know about it.
This will help your brain create connections between new material and the stuff you already know. Open a blank document, create a bulleted list, and start listing off whatever you already know about the topic you’re reading about.
Capture as many sentences, phrases, or concepts as you can think of.
2. Question
Questions are a powerful tool for learning.
When you generate questions before reading, you create mental “targets” for your brain. These mental targets help you be more purposeful in your reading and can increase your overall comprehension. These questions can include:
Areas you have less confidence in and want to improve
Topics or areas you personally want to learn more about
Questions your professor might ask in the upcoming exam
3. Read
The next step is to actively read the text.
Active reading is about engaging with the text while you read. As you read, you should:
Underline any sentences you’ll need to remember in the future, either for an exam, a paper, a project, or an assignment
Circle key terms and underline their definitions or context clues in the paragraph
Answer the questions you generated in step 2. if you come across any answers
4. Summarize
Summarizing reading material in your own words is a great way to increase comprehension and activate retention right away.
After you finish each paragraph, write the following brief summaries:
Margin Summary: Beside each paragraph, write a 3–5 word summary of the contents of the paragraph. This should describe what the paragraph is about or what information it contains. It should allow you to glance at the page and quickly see what each paragraph is about.
Short Summary: Write a 2–3 sentence “simple summary” on your separate sheet of paper. Write as if you’re talking to someone who knows nothing about the material—the most simple and concise the summary, the better.
5. Extract
By this point, you’ll have created the following notes:
Questions and answers
Margin summaries
Short summaries
Key points
Key terms
Next, you can turn all these notes into flashcards using the Anki app.
Anki lets you turn concepts, terms, definitions, visuals, charts, and other essential points in your notes into visual notecards. The app will then automatically create daily review sessions using an internal algorithm. All you need to do is review the cards Anki shows you daily and rate the ease of remembering for each card.
6. Explain
One method for gauging your long-term understanding is to explain the material in your own words.
This method is known as the Feynman Technique. This technique works best after you’ve been studying your notecards for a few days or weeks and feel you have a firm grasp of the material.
Open a blank word processing document or a blank sheet of paper. Open the chapter you’re currently studying and go to the first paragraph. Read the first 2–3 words margin summary without looking at the text and challenge yourself to write a new 2–3 sentence summary of the contents of the paragraph. The goal is to explain as if you were tutoring a beginner on the material. The simpler the explanation, the better.
If you get stuck, return to the paragraph in the textbook and review the part(s) you got stuck on. If you can write a complete summary without requiring any review, move on to the next paragraph and repeat the process.
7. Review
After you’ve completed all the steps above, you’re ready to add ongoing reviews to your study routine.
Your ongoing reviews of the material should include the following:
Recall (Notecards): Studying your notecards daily will help you stay sharp on isolated ideas, concepts, terms, and models. Anytime you find something else you need to memorize in the chapter, add it to your deck on Anki, and Anki will incorporate it into your study sessions.
Explain (Feynman Technique): This will help you maintain fluency with the material. A Retrospective Revision Timetable is an excellent tool for tracking your progress throughout your ongoing reviews. This study tool lets you break your chapter into individual paragraphs or sections and score each based on how easy it is to recall and explain using the Feynman Technique. Each time you review a section, concept, or paragraph in your textbook, use a Retrospective Revision Timetable to
Apply (Quizzes and Drills): You can use an LLM like ChatGPT to generate practice quiz questions you can answer through multiple choice or short answers. This will help you test yourself in random areas of the material for fluency and mastery. You can also acquire additional study materials through an online search, old practice tests provided by your professors, or by generating your own questions.
Input Variation
What is it?
Input Variation is rotating between different but complementary input learning activities.
Why it works
When you first start learning new concepts and ideas, you need to interact with them a lot.
Input learning activities are interactions that add new knowledge and information to your brain. These might include reading, watching, listening, etc. The more interactions you have with them, the faster you’ll understand them.
Rotating between different input learning activities to learn concepts is a great way to maximize your interactions with them.
How to use it
If there’s a concept you’re trying to learn, maximize the amount and type of inputs you receive — this might include:
Listening to podcasts and lectures
Watching videos
Reading articles
Note-Taking
What is it?
Note-taking is capturing concepts and ideas in a written or visual format for future reference.
Why it works
It’s difficult for the brain to “hold on to” multiple novel concepts, terms, and ideas simultaneously.
This is particularly true when you’re learning is new. The brain has to make sense of it, relate it to existing knowledge, and form new neural pathways to access it. All of this effort is known as cognitive load.
Note-taking is a great way to reduce all that cognitive load by offloading your understanding to some visual medium, like pen and paper or a computer document.
Note-taking itself isn’t effective for memorization or remembering, but it is a great way to organize new concepts and ideas mentally.
How to use it
There are a few different types of note-taking you can use:
Sentence note-taking is like creating an inventory of what you need to study later. To use sentence note-taking, capture a long list of individual sentences for the main ideas, concepts, and pieces of information you need to learn. Since you’ll return to your sentence notes later when studying, even as few as 2-3 words per “sentence” (or line) can suffice. When using sentence note-taking, don’t concern yourself with capturing perfect or complete sentences; instead, focus on using whatever language makes the most sense to you.
Outline note-taking is similar to sentence note-taking but also organizes your notes with headings, bulleted or numbered lists, and callouts, all of which provide more structure.
Cornell Notes center your focus around an essential question and organize your notes into study materials from the start. The Cornell Notes method has a variety of unique features that make them highly effective:
All Cornell Notes begin by posing an essential question that helps focus your attention for the note-taking session. Instead of capturing a long list of ideas on the page, the essential question serves as a filter to help you determine whether or not something is worth writing down.
Cornell Notes then divide the page into two columns: one for questions, main ideas, and terms, and another for answers, notes, and definitions. This creates instant study materials that you can use in future study sessions using different methods of forced retrieval.
At the bottom of the page, all Cornell Notes close with a summary of the notes. This summary should answer the essential question at the top and serve as a high-level “abstract” of the note contents.
Charting notes are great for organizing new information into categories or groups. Rather than capturing sentences, questions, and answers, create a chart with categories or characteristics. Then, as you learn about a new concept, you’ll add it to the chart in the appropriate place, helping you to understand the differences and similarities between the concepts.
Mind mapping notes are great for visually organizing new ideas, information, and concepts into a cohesive “structure.”
Click here to learn more about effective note-taking.
Click here to download the LearnChangeDo Learning Notes Database.
Interleaving
What is it?
Interleaving is rotating concepts/topics in each study/practice session.
Why it works
Learners who only focus on learning one topic at a time miss out on the benefits of an approach called interleaving.
Any learning project will have several different sub-topics for you to learn. And rather than focusing on one topic at a time, some research has suggested that learning 2-3 concepts at a time actually leads to more effective learning in the long term. This kind of learning is known as interleaving.
Interleaving engages your brain in a way that naturally promotes understanding and memory. It also gives you more opportunities to “mix it up” when one topic becomes too monotonous.
While interleaving is more challenging in the short term, the efforts will be worthwhile over the lifespan of your learning process.
How to use it
When you plan a study session, choose 2-3 concepts, ideas, or topics to study during that session. These should be related to a common overarching theme but separate concepts you can switch between.
When you study, divide your time between the sessions into smaller blocks, or switch from one topic/concept to another when you get frustrated or reach an impasse.
Create your own learning using the LearnChangeDo Learning Plan Management System.
3. Remembering
Dual Coding
What Is It?
Dual Coding combines words and visuals to make terms and concepts easier to remember.
Why It Works
Some research has shown that our brains are more effective at remembering visuals than text.
But combining text and visuals creates even stronger associations we can use to remember terms, concepts, and definitions. This works best when using forced retrieval or spaced repetition.
How to Use It
Create a list of all the terms or concepts you need to remember, along with their corresponding definitions or explanations
Choose or create a unique visual for each term
Create simple front-back flashcards combining the terms and visuals on one side and the definition or explanation on the other side
Active Association
What is it?
Active association is relating new concepts and ideas to ones you already know and remember.
Why it works
Anytime you learn something new, your brain needs to “encode” it into memory. Your brain does this through association.
A great example of this is language learning. In the early phases of language learning, you have to learn thousands of new words that mean nothing to you. When you learn a new vocabulary word for the first time, your brain will attempt to make sense of it using what you already know. When you read or say the term for the first time, your brain might generate the thought, “This sort of sounds like [another word], which means something similar.” This immediate association can then aid you in remembering and understanding that word in the future.
This is association in action.
Active association is when you deliberately create unique, novel, and, when possible, outrageous associations that make remembering easier. You might choose to remember a word’s meaning in a foreign language through a specific visual or use a mental image to recall the parts of a system.
While this process may seem random and sometimes a bit ridiculous, an essential rule with active association is: the more novel the association, the more likely you are to remember it.
How to use it
The great thing about active association is your brain is already doing it all the time. All you need to do is acknowledge and capture it.
When you need to remember a term, concept, or idea, allow your brain to freely associate it with existing knowledge. These associations can be closely related or completely unrelated — so long as your brain makes an intuitive association with existing knowledge, it can work.
Active association works best when you acknowledge, capture (write), and frequently review the new terms, concepts, and ideas via flashcards or the Feynman Technique using the associations you’ve identified.
Click here to read my in-depth guide on accelerated memorization techniques.
Forced Retrieval
What is it?
Forced retrieval is forcing yourself to remember a term, concept, or idea out of thin air.
Why it works
When studying, learners often make the mistake of reading and re-reading their notes.
They do this with the assumption that the information will “stick.” But for reviews to be effective, they have to be forced. This means: you have to force yourself to remember it out of thin air.
Reading and re-reading notes doesn’t force you to remember anything. The information is right in front of you.
Forced retrieval is about creating unique scenarios that force you to remember what you’re learning without the help of notes and resources.
While this is much harder than re-reading notes, it’s far more effective at improving long-term memory. It’s the cognitive strain that you subject your brain to that pushes what you’re learning from short-term to long-term memory.
How to use it
There are two main ways to use forced retrieval:
The notecard method
The Notecard Method
Create a front-back notecard. On the front, write a question, term, or some prompt that will require you to recall what you need to memorize. On the back, write the answer, the definition, or the response to the prompt you wrote on the front. Create a card for every piece of information you need to memorize.
Read the front of the card and force yourself to remember what’s on the back (without looking). If you see a question on the front of the card, verbally state the answer out loud. If you see a term on the front of the card, verbally say the definition out loud. If you have a visual prompt on the front of the card, verbally state the answer that’s on the back of the card. Once you come up with your “final answer,” turn the card over and see if you are right.
Repeat until every card is easy to remember. Repeat this process of reading the front, forcing yourself to recall what’s on the back, and checking if you were right. Do it until every card is easy for you to remember. Then, change the cards up to recall the information from different perspectives or add new ones for new information.
The Feynman Technique
Open a blank document and write the topic or concept at the top of the page. Then, right below, write out an explanation of the topic or concept as if you’re explaining it to a child. Don’t use any notes or reference material. Challenge yourself to go straight through the entire explanation on your own.
If you can make it all the way through, that indicates you have a solid understanding of the topic or concept.
If you can’t, identify where you got stuck and go back to your learning material to review. Repeat this process until you can get through the entire explanation without needing any source material.
You can take this a step further by challenging yourself to create higher-level explanations — for example:
Imagine you’re explaining it to a five-year-old — this will force you to create analogies, use simpler words, and assess your current understanding.
Imagine you’re explaining it to a college freshman — this will allow you to incorporate more detail and higher-level concepts while still maintaining a concise explanation.
Imagine you’re explaining it to an experienced practitioner — this will allow you to use the full range of vocabulary, concepts, and ideas you’ve learned while challenging yourself to maintain sufficient accuracy.
Click here to check out my in-depth guide on accelerated memorization techniques.
Spaced Repetition
What is it?
Spaced repetition when you repeatedly review what you’re learning at increasingly spaced-out intervals.
Why it works
The brain needs lots of energy to function properly.
One energy conservation tactic the brain employs is forgetting. The less your brain has to hold in short-term memory, the fewer resources it has to use.
This means your brain is constantly forgetting on purpose. And while this is good for healthy brain function, it’s not all that helpful when you’re trying to learn something.
One way to visualize this process is through the Ebbinghaus Forgetting Curve:
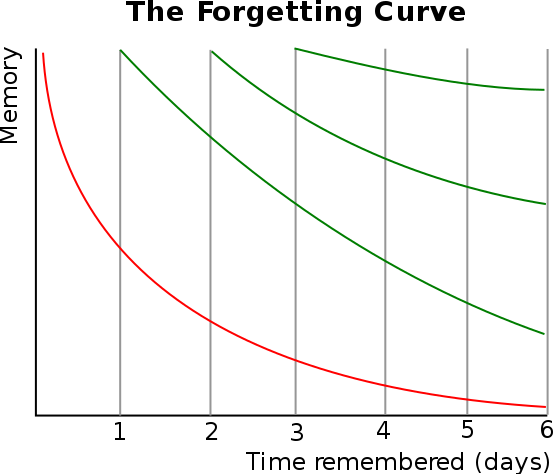
The red curve on the chart above represents your remembering ability for a new concept or idea. With each day that passes after your initial learning (see the days at the bottom of the chart), your ability to remember it diminishes rapidly.
The green curves represent your remembering ability with additional reviews. With each day you review a concept or idea, your ability to remember it is enhanced, illustrated by the curves getting flatter.
Forced retrieval works to counteract the forgetting curve through strategically spaced-out reviews. After your initial learning of a concept or idea, you might review it again the next day and maybe a few days after that. Then, as it gets easier to remember it, you start to “space out” the amount of time between reviews. Just as the forgetting curve starts to steepen, you surprise your brain with another forced review.
This might look like reviewing after a single day, then three days, then seven days, then ten days, so on and so forth, until you can go several weeks or months between reviews without it being difficult to remember.
How to use it
The easiest way to use spaced repetition is using the notecard method.
While you might prefer to create physical notecards, the free app Anki is a powerful tool that combines digital notecards with an internal spacing algorithm. It’s the go-to study tool for medical students and learners in high-stakes programs.
Anki lets you create different kinds of notecards for whatever material you’re trying to memorize.
Each day, Anki will create study sessions for you. Each study session will present you with one side of a notecard and force you to remember what’s on the other side. After you recall the material, you rate how easy it was to remember (or if you weren’t able to remember it). Anki will then automatically show you that card again at some point in the future based on how you rated it.
Click here to download Anki for free.
Chunking
What is it?
Chunking is the technique of breaking down large, complex ideas into smaller, more manageable parts and learning or memorizing them in groups.
Why it works
Mental demands you put on your brain through thinking, memorizing, and understanding create cognitive load.
The more cognitive load you put on your brain, the less effective your brain can think, memorize, and understand. This is why many learning techniques are based on breaking things down into smaller parts. When concepts and ideas become easier to grasp, the brain can work more effectively.
Similar to Fractalizing, which also involves breaking down ideas into smaller parts, chunking then takes those parts and re-connects them at a gradual pace.
How to use it
Start by defining the concept or idea you need to learn next
Use Fractalizing to break the concept down into its individual parts
Familiarize yourself with each part individually
Create “chunks” by finding pairs trios of parts that are closely associated or related to one another
Use techniques like forced retrieval, spaced repetition, and the Feynman Technique to remember and understand the chunks together
Over time, you can add to each chunk or connect existing chunks to form larger ones
Fractalizing
Topics, ideas, and skills are always comprised of smaller topics, ideas, and skills.
Anything you’re learning can be broken down into simpler, smaller parts through fractalizing. This technique makes it easier to understand more complex topics, ideas, and skills by reducing complexity. Here are a few strategies for fractalizing what you’re learning:
Break the concept down into its simplest parts using a mind map. A mind map will help you understand the different parts of the concept independently, making it easier to understand the whole.
If you’re learning a skill, break it down into its simplest behavioral steps. Think of this like a checklist you would give a complete beginner. If the skill is highly-physical (sports, dancing, instruments, etc.), slow down the speed that you complete the skill. If the skill is less physical (work tasks, manual tasks, etc.), break the skill down into a checklist of sub-steps. Then, refine each sub-step individually before gradually speeding up again.
Memory Palaces
What are they?
Memory palaces are mental visualizations of physical locations that help you memorize large amounts of information using association.
How do they work?
Association is a key feature of memorization.
The more associations your brain can make between what you already know and what you’re learning, the faster and longer you’ll remember it. One way to do this is to associate new nodes of information with ones that are already embedded in your long-term memory.
Whether you realize it or not, your brain is quite good at remembering the layout of locations you’ve been to and experienced throughout your life. These locations can include homes where you grew up, buildings, workplaces, outdoor areas, parks, and virtually any “space” in your memory. A memory palace makes use of this by turning your memory of physical locations into organizational frameworks you can use to create novel associations.
Since physical locations are already embedded in your long-term memory without any effort, creating a memory palace is simply “placing” a list of concepts, ideas, or topics throughout that location in your mind. When you do, remembering is simply a matter of “walking through” your memory palace.
How to use them
Make a list of the concepts or ideas you need to remember
Go through your list and pick a physical object to represent each one (the more bizarre, funny, or outrageous the object is, the better)
Pick a physical location you have in your memory — the layout should be a place you can mentally visualize without any effort
In your imagination, walk through the location you picked; at different points throughout, imagine yourself “placing” each item on your list, either in a particular order or in whatever sequence makes sense to you
After you’ve “placed” all your items, review your memory palace regularly by walking through it in your imagination, encountering each item, and using forced retrieval to recall what the object represents
Visualizations
What are they?
Visualizations turn content you’re learning into mental visualizations that are easy to remember.
Why they work
One of the best ways to quickly remember new information is to associate it with what you already know.
Your brain is already memorizing all the time. It knows automatically remembers the layout of physical spaces you visit. It remembers the general shape and features of objects and tools you use. It does all of this automatically to save time and energy in the future.
By creating and representing your learning material with visuals in your imagination, you associate new information with what’s already in your long-term memory.
Visualizations are similar to memory palaces, but instead of using a physical location, you use an object. This object can be real or imaginary.
You can create a visualization to learn and memorize anything.
How to use them
Create a list of concepts or ideas you need to memorize
Pick (or create) an object related to those topics or ideas — this can be:
A real-life item or tool you use on a regular basis
An imaginary object you create in your mind
A symbol or logo you’re familiar with
Create “touchpoints” at various parts of the item or object — for example, if your chosen object was a hammer you might create the following touchpoints:
The flat metal part of the hammerhead
The curved part of the hammerhead
The very top of the hammerhead
The shaft of the hammer
The base of the hammer
Each of these touchpoints becomes a place where you can create associations with what you’re learning.
Associate your list of topics or concepts with each of the touchpoints, creating additional ones as needed
When it’s time to review or remember that list of concepts, imagine the object or tool you used and mentally recall each touchpoint
Acrostics
What are they?
Acrostics turn lists and sequences of concepts or ideas into easy-to-remember “catchphrases.”
Why they work
Acrostics are one of the oldest memory tricks around.
A simple example of an acrostic is, “Please excuse my dear aunt Sally.” This acrostic helps you remember the order of operations in math (parenthesis, exponents, multiplication, division, addition, and subtraction).
Think of acrostics as shortcuts for simplifying hard-to-remember lists, sequences, and procedures.
How to use them
Create a list of the ideas or concepts you need to remember
Create an imaginary sentence where each word begins with the first letter of an item in your list — for example:
Every Good Burger Deserves Fries could help you remember the notes of the staff for a treble clef staff (E G B D F)
When you need to review or remember that list of ideas or concepts, repeat or mentally state your acrostic, and use the first letter of each word to remember each one
Acryonyms
What are they?
An acronym is an abbreviation of the first letter of each item in the list.
Why they work
Similarly to acrostics, acronyms are chunking techniques that turn lists of items into a single word that’s easy to remember.
While acrostics are built around visual imagery and phrases (”Please excuse my dear aunt Sally), mnemonics are oriented around individual words that are unique and easy to remember.
One famous acronym in the finance world comes from the legendary stock trader William O’Neil who coined the unique acronym CANSLIM. “CANSLIM” represents a criterion for selecting the best-performing stocks in the stock market, with each letter representing a different part of O’Neil’s criteria:
C - Current earnings per share
A - Annual sales and return on equity
N - New product, management, or regulatory environment
S - Supply and demand
L - Leader or laggard
I - Institutional sponsorships
M - Market direction
The famous CANSLIM acronym, though introduced publicly way back in 1953, is still the guiding approach to stock selection for many stock traders today.
Coming up with an acronym for any list of ideas or concepts can be a fun exercise that further improves your memory. Once created, you can use an acronym for remembering just about anything. When paired with other strategies like forced retrieval or mind maps, acronyms can be a foundational part of your learning.
How to use them
Create a list of the ideas or concepts you need to remember
Write out the first letter of each word
Move the letters around to create either an existing word or an imaginary word that’s easy to remember — the more unusual and unique the word, the easier it’ll be to remember
4. Understanding
What is it?
Slow learning is when you reduce the complexity of the skill you’re learning as much as possible.
Why it works
Paradoxically, learning slowly on purpose is a powerful accelerated learning technique.
Despite its name, accelerated learning isn’t so much about learning fast as it is about learning effectively. Effective learning leads to “faster” learning over time. The less you have to go back and re-learn or fill gaps in your understanding, the quicker you’ll be able to learn in the long run.
Slow learning is all about getting it right the first time by reducing complexity as much as possible.
To reduce the complexity of a skill:
Do it for less time
Do it with less intensity or at a slower pace
Create and use visual aids or guides to reduce cognitive load
Slow learning works particularly effectively when:
You’re learning something for the first time
You’re re-learning an area of weakness
Through deliberate, slow learning, you force yourself to get it right the first time, decreasing the need for re-learning later on.
Learning something for the first time is much easier than repeatedly re-learning something you learned incorrectly. And the more often you learn incorrectly, the more time you’ll waste having to go back and fix mistakes in the future.
Slow learning can mean reading slower, focusing on fewer concepts in a single study session, or pausing more frequently to check for understanding (self-questioning).
Of course, the biggest barrier to implementing slow learning is impatience.
We all want to gain knowledge and skills fast (you’re reading this article, after all). But if that motivation turns into impatience during learning and practice sessions, new problems will arise:
You’ll make things more difficult for yourself
You’ll learn concepts and ideas incorrectly
You’ll misinterpret information and data
You’ll overlook important details
You’ll make more mistakes
You’ll become frustrated
You’ll build bad habits
When in doubt, slow down more than you think you need to.
How to use it
Pick a skill or topic you need to improve
Decide how you will reduce the complexity:
Will you do it for less time?
Will you do it with less intensity or at a slower pace?
Will you create and use visual aids or guides to reduce the cognitive load?
Practice or learn at the level of reduced complexity until you are consistently correct or proficient on self-tests or skill checks
Gradually increase one element of complexity until you’re at the level of complexity required by the skill or topic
Fractalizing
What is it?
Fractalizing is breaking down topics/concepts into their independent, mutually exclusive parts.
Why it works
Topics, ideas, and skills are always made up of smaller topics, ideas, and skills.
For example, if you wanted to learn about investing, you could fractalize “investing” into:
Technical analysis
Security analysis
Market cycles
Etc.
Each of these individual topics could be further fractalized into more granular topics and concepts.
In the same way you reach a book one chapter at a time, you should learn larger concepts by understanding their component parts first. This gives you a macro view of the concept and gives you a deeper understanding of how the parts work together.
How to use it
You can fractalize concepts/topics using:
Numbered lists - These work best when you’re fractalizing a sequence of steps or stages for a skill or process. The numbering helps you understand the parts in sequence from start to finish. Start by writing the skill or process at the top of the page and creating a numbered list with all of the steps/states in sequence.
Bulleted lists - Bulleted lists work great when the sequencing doesn’t matter. Start by writing the skill or process at the top of the page and creating a bulleted list of all the individual fractalized parts.
Mind maps - Mind maps work best when you’re dealing with more complex systems with fractalized parts that relate to each other. If you’re trying to understand the causes and effects of parts and the relationships between them, mind maps would be your method of choice. Start by creating your first mind map bubble with the topic/concept in the center. Then, draw an arrow connecting to a second bubble with the first fractalized concept. Continue this process for each fractalized concept, and if necessary, add additional arrows between any related ones.
For a simple note-taking database with pre-loaded templates for fractalizing, download the LearnChangeDo Accelerated Learning Notes Database.
Self-Questioning
What is it?
Self-questioning is generating (and answering) self-generated questions before, during, and after your learning.
Why it works
Questions are powerful learning tools. They create unique feedback loops that:
Pose you with a prompt
Requires you to recall or do something
Provide instant and objective feedback
This process helps you retain information for longer periods, improves your comprehension, and helps you “fill the gaps” in your learning.
That’s why, in all your study sessions, questions should be at the foundation of your reviews.
Self-questioning makes use of this at three points in the learning process:
Before you start learning
While you’re learning
After you learn
How to use it
Pre-Learning Self-Questioning
Before you start reading about or exploring a new concept or topic, take some time to generate and capture some of your current questions about it.
These questions might relate to:
Curiosities you have about the material
Points you’ve always been unsure about
Questions you think might be relevant in the future (like for a test or scenario)
Then, as you explore the material for the first time, stay on the lookout for answers to these questions and write down the answers when you find them.
Intra-Learning Self-Questioning
Suppose you’re reading a book to learn new concepts and ideas.
The best approach for this kind of situation is to underline important sentences, circle key terms, and write a few words beside each paragraph. This is a great way to familiarize yourself with the material on a first pass. But you can also take this a step further using self-questioning.
After reading a paragraph, take your eyes off the text and ask yourself:
“What did I just learn?”
Then, either verbally or in writing, write out a 1-3 sentence summary of the key points and important terms.
Post-Learning Self-Questioning
After you finish a learning activity like reading a chapter or watching a video, generate (and answer) more questions.
Some of these questions might be:
What were the main points?
What mental models or frameworks did I learn?
What key terms did I learn, and what are their meanings?
The key to self-questioning is to generate questions before, during, and after your learning.
The Feynman Technique
What is it?
The Feynman Technique involves breaking down a topic into its simplest parts through a real-time explanation without using notes.
Why it works
The Feynman Technique works because it reveals gaps in your understanding of a topic.
If you’re able to recall isolated facts and concepts, the next level of understanding is understanding. The best way to do this is to force yourself to:
Break the concept into individual parts
Reconstruct them through a real-time explanation
Suppose you’re learning about monetary inflation.
If you just finished a book chapter about inflation and feel you have a solid grasp of the material, you could check that understanding by challenging yourself to explain it either verbally or through writing.
But what makes the Feynman Technique unique is the way it forces you to deconstruct a topic:
Rather than using high-level technical language, instead, you imagine as if you were explaining it to a 10-year-old.
As the adage goes:
“If you can’t explain it to a child, you don’t understand it.”
If you get stuck during your explanation, take note of the point where you got stuck, and review that part of your notes or source material. The idea is to try the explanations multiple times until you’re able to do one without needing source material.
After you’re able to complete successive explanations of topics without needing notes, you can be confident you understand them.
How to use it
Start by choosing a topic you want to learn
Write out an explanation of the topic “on the spot” as if you’re explaining it to a child without using any notes or reference material
If you’re able to create a complete and accurate explanation without needing the assistance of your learning resources, you likely have a proficient understanding of the topic
If you can’t, figure out which topic or concept you got stuck on and return to your learning material to review it
Repeat steps 1. and 2. until you can get through the entire explanation without needing any source material
You can use the LearnChangeDo Retrospective Revision Timetable to track your explanations over time.
Download the Learning Plan Management System for everything you need to create a learning plan, generate subgoals, and track your learning progress.
5. Applying
Purposeful Practice
What is it?
Purposeful practice is a method of practice built around clear practice goals, focused practice sessions, and direct feedback.
Why it works
A common mistake is practicing a skill repeatedly, assuming that more repetition will automatically lead to better results.
In most cases, more repetition can lead to worse results, especially if those “reps” are incorrect or incorporate a lousy technique. Instead, a more effective way to improve skills is to use purposeful practice.
The model for purposeful practice comes from the work of Anders Ericsson, who wrote extensively about his purposeful practice method in his book Peak: Secrets from the New Science of Expertise. Ericsson developed through his 30-year study of world-class performers and experts.
Ericsson found there are three critical ingredients for using purposeful practice:
Clearly-defined “stretch goals - You need to work toward a goal that stretches you just beyond your current ability.
Focus - You need total engagement with the skill while practicing (no distractions).
Feedback - You need to get and incorporate objective feedback.
How to use it
Capture a baseline for your current ability on the task you’re practicing — this could be a score, a rating, a metric, a total frequency of successful attempts, or any other metric that captures your current ability
Create a goal that is just outside your current ability — this goal shouldn’t be easily attainable within 1-2 practice sessions
Prepare your environment by removing all distractions — if possible, all that should be present in the practice setting are yourself and any materials you need to practice the skill
Work toward achieving the goal during your practice session — when you reach an impasse or barrier, challenge yourself to work around them by coming up with multiple solutions or by reducing the complexity of the skill and gradually reintroducing complexity until you’re able to overcome it
Always log your progress and when you reach your goal, create a new one just outside your current ability
For more on using purposeful practice, see How to Practice Skills Effectively.
Deficiency Optimization
What is it?
Deficiency optimization is when you prioritize your learning or practice sessions around the material you’re least proficient on.
Why it works
Zeroing in on our most significant weaknesses is the only way to remove them.
If a musician needs to learn a difficult piece of music but only practices the parts they’re good at, they’ll never play it well enough to perform it. Instead, that musician needs to identify and practice the parts their least proficient in.
This is called deficiency optimization.
One reason learners avoid this strategy is it’s uncomfortable. It isn’t fun to work on the stuff you’re not good at.
But studying, learning, and practicing aren’t supposed to feel the same as acing a test or nailing a performance. Learning sessions should get you out of your comfort zone and challenge you with what you don’t know or can’t do just yet. Over time, those aspects of your learning will become stronger and stronger, improving your overall ability.
Whatever you’re learning, challenge yourself to face your weaknesses head-on and maybe, turn them into new strengths.
How to use it
Record or capture a representation of your current ability on a skill or task
With a teacher or by yourself, review the performance and create a list of areas of most needed improvement
Create a list of exercises or activities you can use in future practice sessions
Start your future sessions with these areas and spend the majority of your sessions on them
One powerful tool for tracking your weaknesses on a learning goal is a Retrospective Revision Timetable. Learn more about how to use one here or download the LearnChangeDo Retrospective Revision Timetable for Notion here.
Generation
What is it?
Generation is when you try to solve or figure something out before you see a solution.
Why it works
All learning is a product of feedback.
When you try to do something, like solve a problem or write a line of code, you need to know if you’re right. Otherwise, you could be reinforcing bad habits or incorrect assumptions.
If, after you solved that problem or wrote that line of code, you could check your work against the solution, that creates an immediate feedback loop.
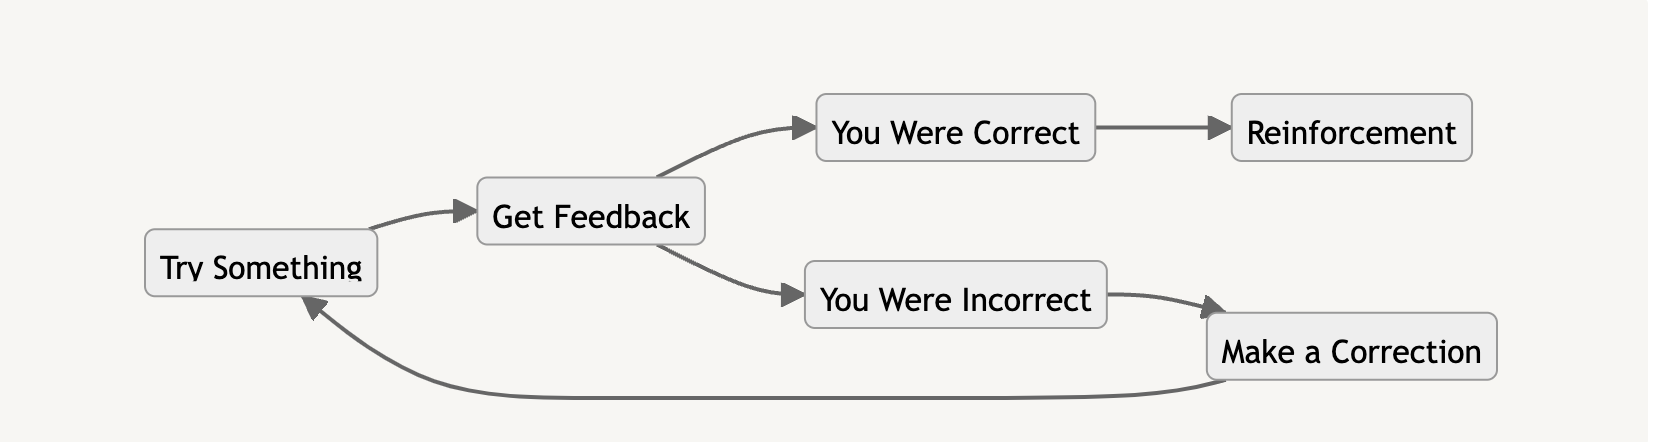
How to use it
Curate a collection of problems, case studies, or exercises that are binary (there should be a right answer to each)
Gather the answers but don’t review them
Solve the first problem, case study, or exercise using your own logic and skills
Immediately check the correct answer
If you were correct, move onto the next one
If you were incorrect, target the gaps in your logic or skills, make an adjustment, and capture in writing or verbally the correction you will make in the future
Complete steps 1. - 4. until you complete all the problems, case studies, or exercises
6. Analyzing
Graphic Organizers
What are they?
Graphic organizers are visual representations of knowledge and concepts based on the connections between them.
Why they work
The brain is only able to “hold onto” a discrete amount of information at any given time.
When learning complex topics that involve interrelated parts, the brain can only hold a certain amount of new information in short-term memory. Graphic organizers let you “offload” concepts, ideas, and information into a visual reference. As you learn and discover new information, you can add them to your graphic organizer and build a cohesive visual representation of what you’re learning.
Graphic organizers are great tools for understanding and exploring:
How two or more ideas compare and contrast
A process or sequence of events
Relationships between concepts
Cause-and-effect relationships
Taxonomies and hierarchies
How to use them
Using the list above, determine the type of graphic organizer you need based on what you’re learning — you’ll either need to:
Analyze how to or more ideas compare and contrast
Define a process or sequence of events
Analyze the relationship between concepts
Determine cause-and-effect relationships
Break something into a taxonomy or a hierarchy
Create the graphic organizer that corresponds to the type of analysis you’re doing:
Analyze how to or more ideas compare and contrast: https://en.wikipedia.org/wiki/Venn_diagram
Define a process or sequence of events: https://en.wikipedia.org/wiki/Flowchart
Analyze the relationship between concepts: https://en.wikipedia.org/wiki/Concept_map
Determine cause-and-effect relationships: https://en.wikipedia.org/wiki/Ishikawa_diagram
Break something into a taxonomy or a hierarchy: https://en.wikipedia.org/wiki/Structure_chart
7. Evaluating
Calibration
What is it?
Calibration is turning specific feedback into activities for future learning/practice sessions.
Why it works
The most important ingredient for gaining knowledge and developing skills is feedback.
Feedback is whatever happens after you try something or answer a question that tells you if you’re right or wrong. Ideally, feedback should be specific and not generic (for example, simply getting a question wrong on a test vs. a professor telling you why you got it wrong). The more you can implement feedback into your learning, the faster you’ll improve and reach your learning goals.
But when it comes to getting feedback, there’s one significant barrier that holds most learners back: feedback is uncomfortable.
It’s not always fun or pleasant to have someone tell you that you got something wrong or that you need to improve. But opening yourself up to valuable feedback can help you rapidly improve your learning ability. All you have to do is keep an open mind and implement whatever valid feedback you get.
Calibration is a specific kind of feedback that helps you plan your future practice or work sessions.
While most people receive feedback, either verbally or in writing, and make a “mental note” of it, calibration takes this a step further: it turns that feedback into specific goals or routines for future practice sessions.
How to use it
Perform or send a representation of your product/performance to a trusted advisor, mentor, or. teacher
Capture (either through audio or in writing) all of the feedback received about your product/performance
Allow at least one day to pass
Review the feedback and turn each feedback point into a specific technique, exercise, or activity you can incorporate in your next practice/work session